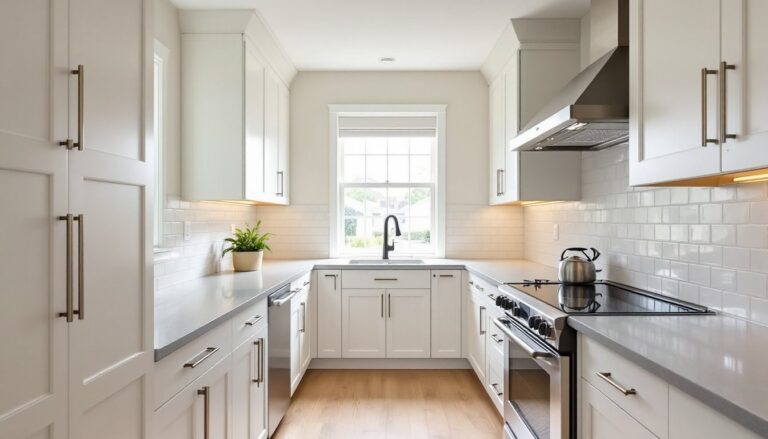
Converting a garage into a bedroom adds usable square footage without the cost of a full addition. Whether someone needs a guest suite, a rental unit, or space for aging parents, the garage offers a solid foundation, walls, a roof, and a slab. But don’t underestimate what’s involved. This isn’t a weekend paint job. Insulation, electrical upgrades, climate control, and often permitting requirements make this a project that requires serious planning. Done right, though, a garage bedroom can feel like it was always part of the house. Here’s how to tackle it the right way.
Table of Contents
ToggleKey Takeaways
- Garage bedroom conversions add usable square footage without the cost of a full addition, but require serious planning beyond basic cosmetic work.
- Permits are mandatory for garage-to-bedroom conversions and typically cost $500 to $2,000; skipping them can torpedo resale value and create liability.
- Proper insulation (R-13 to R-15 in walls, R-30 to R-38 in ceilings) and climate control like ductless mini-splits ($2,000-$4,000) are essential to make garage bedrooms comfortable and habitable.
- Luxury vinyl plank with attached underlayment is the best flooring option for concrete slabs, offering waterproofing and durability without moisture damage risks.
- Upgrade electrical systems to NEC standards with outlets spaced no more than 12 feet apart and layer lighting with recessed cans, wall sconces, and task lighting for a polished finish.
- Open garage layouts benefit from strategic wall partitions, closets, and built-in storage to create functional zones while maintaining a spacious feel.
Why Convert Your Garage Into a Bedroom?
A garage conversion makes sense when adding bedrooms without the expense and complexity of a ground-up addition. The structure already exists, the bones are there. That means no foundation work, no framing exterior walls from scratch, and no roofing contractor.
For homeowners with aging parents, a garage bedroom provides main-floor accessibility without stairs. Rental income is another driver, especially in markets where ADUs (accessory dwelling units) are in demand. Some jurisdictions even offer expedited permitting for ADU conversions.
The catch? Not every garage is a good candidate. If the space doubles as storage for tools, seasonal gear, and vehicles, homeowners need a plan for relocating all that before framing the first wall. And if the garage shares a wall with living space, sound transmission becomes an issue worth addressing early.
Essential Planning and Permits Before You Start
Permits aren’t optional. Converting a garage into habitable space triggers building codes that cover egress, ceiling height, electrical, insulation, and heating. Most jurisdictions require at least one egress window or door that meets IRC (International Residential Code) standards, typically a minimum opening of 5.7 square feet with a sill height no more than 44 inches above the floor.
Ceiling height is another sticking point. Habitable rooms require a minimum of 7 feet in most areas. Garages with low ceilings or exposed trusses may need structural modifications, which means involving an engineer.
Zoning can also block conversions in some areas, especially if the property loses required off-street parking. Check with the local planning department before buying materials. Some cities have specific ADU programs that streamline approvals, while others treat garage conversions as major alterations requiring full plan review.
Budget for the permit process. Plan review and inspection fees vary, but expect $500 to $2,000 depending on scope and location. Skipping permits might seem like a shortcut, but it can torpedo resale value and create liability if something goes wrong.
Insulation and Climate Control Solutions
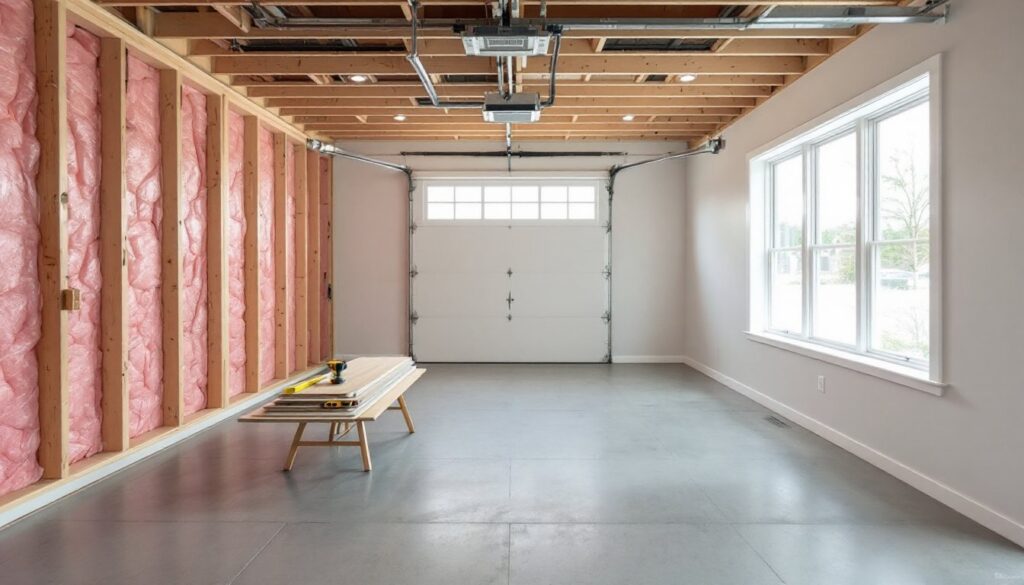
Garages are built to store cars, not people. That means minimal or zero insulation in the walls, ceiling, and especially the garage door. Thermal bridging through uninsulated studs and slabs makes these spaces uncomfortable without serious upgrades.
Start with the walls and ceiling. Most conversions benefit from R-13 to R-15 batt insulation in 2×4 walls and R-30 to R-38 in the ceiling, depending on climate zone. Closed-cell spray foam is worth considering for rim joists and any tricky gaps around the old garage door header. It costs more per square foot but stops air infiltration better than batts alone.
The floor is trickier. Concrete slabs conduct cold and can wick moisture. If the slab is in good shape, a floating subfloor with rigid foam insulation (at least R-10) underneath creates a thermal break. Products like DRIcore or a simple 2×4 sleeper system with XPS foam between sleepers work well. Just make sure to leave expansion gaps at the perimeter.
HVAC is non-negotiable. Extending the existing forced-air system is one option, but it often requires upsizing the furnace or adding a dedicated zone. A ductless mini-split is easier to install and gives independent temperature control, ideal if the bedroom will be used as a rental or in-law suite. Expect to pay $2,000 to $4,000 installed for a single-zone unit.
Don’t forget a vapor barrier if the garage sits on a slab-on-grade. Six-mil polyethylene under the subfloor prevents moisture migration, especially in humid climates.
Flooring Options That Work Best for Garage Bedrooms
Flooring over a concrete slab has to handle two issues: thermal comfort and moisture resistance. Carpet feels warm underfoot but traps moisture and odors if the slab ever gets damp. Hard surfaces are more durable but need proper underlayment.
Luxury vinyl plank (LVP) is the go-to for most garage conversions. It’s waterproof, installs as a floating floor, and handles minor slab imperfections. Look for products with an attached underlayment and at least a 20-mil wear layer for durability. LVP over a foam or cork underlayment adds a bit of sound damping and warmth.
Engineered hardwood works if the slab is bone-dry and there’s a proper vapor barrier and subfloor. Solid hardwood is a bad call, it’ll cup or warp with even minor moisture exposure.
For a budget-friendly approach, laminate flooring offers decent performance as long as moisture isn’t an issue. Pair it with a good underlayment that includes a vapor barrier.
Some DIYers go with carpet tiles over a raised subfloor system. They’re modular, easier to replace if stained, and add cushioning. Just make sure the slab is sealed and the subfloor includes rigid insulation.
Avoid peel-and-stick vinyl or any glue-down products unless the slab has been thoroughly moisture-tested. A simple calcium chloride test (available at most home centers) can reveal hidden moisture problems before they ruin a floor.
Creative Layout and Design Ideas to Maximize Space
Garages are typically wider than standard bedrooms, often 20 to 24 feet, but lack the interior walls that create functional zones. That open layout is both an opportunity and a challenge.
One effective approach is to frame a closet or half-wall partition to break up the space without making it feel cramped. A shallow closet (minimum 24 inches deep) along one wall provides storage and adds architectural interest. If plumbing is nearby, tucking a three-quarter bath behind a partition creates a true suite.
Lighting plays a huge role in making a garage bedroom feel intentional. Garages often have a single overhead fixture and maybe a bare bulb by the door. Plan for layered lighting: recessed cans for general illumination, wall sconces or bedside lamps for task lighting, and maybe a pendant or statement fixture to anchor the room.
If the garage door remains in place (not recommended for a full conversion but sometimes done for flex spaces), consider garage gym setups as an alternative use that keeps the space adaptable. For a dedicated bedroom, though, removing the door and framing a proper wall with windows is the better call.
Built-in furniture, like a Murphy bed or platform bed with integrated storage, helps in smaller garages (single-car, around 12×20 feet). Every square foot counts when working with limited space.
Paint and finishes matter. Lighter colors and semi-gloss or satin sheens reflect more light and make the space feel larger. Avoid heavy drapes: opt for cellular shades or blinds that provide privacy without blocking natural light.
Lighting and Electrical Upgrades for Comfort
Garages are typically wired for a single circuit, maybe a couple of outlets and an overhead light controlled by a single switch. Converting to a bedroom means upgrading to NEC (National Electrical Code) standards for habitable rooms.
Bedrooms require at least one 15-amp or 20-amp circuit for general lighting and receptacles, plus GFCI-protected outlets if there’s a bathroom or kitchenette. Outlets should be spaced no more than 12 feet apart along walls, with at least one on each wall longer than 2 feet.
Recessed LED cans are the cleanest look for garage conversions. Space them about 4 to 6 feet apart for even coverage. Avoid putting them directly over where the bed will go, no one wants a spotlight on their face at night. Dimmer switches add flexibility and improve the room’s ambiance.
If the ceiling is low (common in older garages), skip recessed lights in favor of flush-mount or semi-flush fixtures that don’t eat up headroom. Under-mount LED strips along built-in shelving or inside closets add task lighting without taking up space.
Safety note: Electrical work beyond simple fixture swaps usually requires a permit and possibly a licensed electrician, especially if running new circuits or upgrading the panel. DIYers comfortable with wiring can handle some tasks, but get the work inspected. Faulty wiring in a bedroom is a fire hazard.
Consider adding USB outlets near the bed for charging devices, these are inexpensive and a nice upgrade that feels modern. If the room will serve as a rental or guest suite, a ceiling fan with integrated lighting improves comfort and air circulation without adding a separate HVAC zone.
Conclusion
A garage-to-bedroom conversion is a solid way to add living space, but it’s not a simple cosmetic flip. Insulation, flooring, electrical, and permitting all require careful planning and execution. Homeowners who invest in proper climate control and finish work end up with a space that feels like part of the house, not a tacked-on afterthought. Take the time to do it right, future occupants (and resale appraisers) will notice.