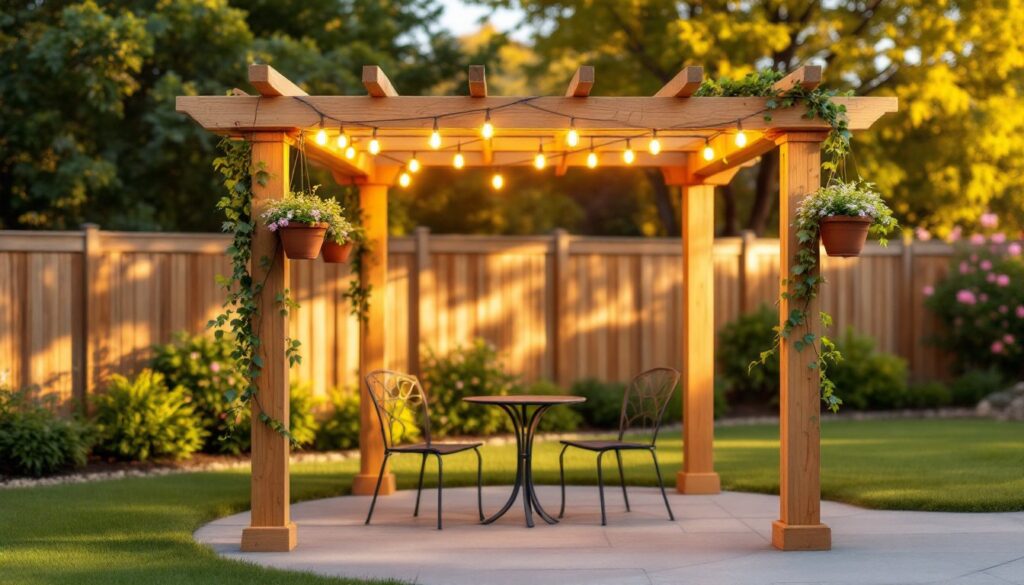
A small pergola packs serious punch in a compact yard. Whether it’s defining a cozy corner, framing a doorway, or adding vertical interest to a plain patio, these structures deliver architectural charm without swallowing square footage. Unlike full-size pergolas that dominate a landscape, smaller versions offer flexibility, they’re easier to build, require fewer materials, and can often be completed in a weekend. For DIYers working with tight budgets or limited space, a mini pergola provides the perfect balance of impact and practicality. This guide covers design ideas, material requirements, and creative finishing options to help builders create a custom outdoor feature that fits their yard and skill level.
Table of Contents
ToggleKey Takeaways
- Small pergola projects (typically 6×6 to 8×10 feet) can be completed in a weekend for $200–$500 in materials, making them ideal for DIYers with tight budgets or limited yard space.
- Corner and L-shaped small pergola designs maximize unused space by defining zones without blocking sightlines, while freestanding designs offer flexibility for patios and decks.
- Proper material selection and secure fastening—using pressure-treated 4×4 posts, galvanized bolts, and post anchors set below the frost line—ensure your DIY small pergola lasts 20+ years rather than just 5.
- Climbing vines like clematis and wisteria, string lighting, and retractable shade sails transform a bare pergola into a functional outdoor room that extends your living space.
- Attached pergolas require ledger-board installation with proper flashing and bolting to house framing (not siding), while most jurisdictions classify structures under 120 square feet as accessory buildings requiring minimal or no permits.
Why Small Pergolas Are Perfect for Compact Yards
Space constraints don’t mean sacrificing style. A small pergola, typically 6×6 feet to 8×10 feet, offers multiple functional advantages in tight quarters.
Defines zones without walls. In a small yard, physical boundaries can make spaces feel cramped. A pergola creates visual separation between a dining area and garden bed, or a lounging spot and play zone, without blocking sightlines or airflow.
Vertical interest in flat landscapes. Many compact yards lack mature trees or architectural features. A pergola adds height and dimension, drawing the eye upward and making the entire space feel larger. This vertical element becomes even more pronounced once vines or hanging planters are added.
Easier permitting (usually). Most jurisdictions classify structures under 120 square feet as accessory buildings that don’t require permits, though rules vary widely. A 6×6-foot pergola clears that threshold easily. Always check local codes, setback requirements, height limits, and frost line depth for footings still apply.
Lower material costs. A compact design means fewer 4×4 posts, shorter 2×6 or 2×8 rafters, and reduced hardware. Builders can often complete a project for $200–$500 in materials, depending on lumber grade and finish choices.
DIY-friendly scale. Smaller pergolas require less muscle and fewer helpers. Two people can typically handle beam placement and post leveling without renting equipment or hiring a crew.
Essential Materials and Tools for Building a Small Pergola
Proper material selection makes the difference between a structure that lasts five years and one that lasts twenty.
Lumber and Hardware
- Posts: Pressure-treated 4×4s (actual dimensions: 3.5×3.5 inches) are standard. For an 8-foot finished height, buy 10-foot lengths to allow for below-grade footings.
- Beams: 2×6 or 2×8 pressure-treated lumber for the main support beams. Cedar or redwood resist rot naturally but cost 2–3× more.
- Rafters: 2×4s spaced 16 to 24 inches on center work for most small designs. Closer spacing creates more shade: wider spacing keeps the structure lighter.
- Fasteners: Use galvanized or stainless structural screws (3-inch minimum) or carriage bolts for beam-to-post connections. Avoid basic deck screws, they’re not rated for structural loads.
- Post anchors or concrete: Metal post bases keep wood off the ground and prevent rot. Alternatively, set posts directly in concrete footings (dig below frost line, typically 12 to 48 inches depending on region).
Tools
- Circular saw or miter saw (miter saw gives cleaner angled cuts for decorative rafter tails)
- Drill/driver with spade bits or auger bits for pilot holes
- Post hole digger or power auger (rent if setting concrete footings)
- Level (4-foot minimum) and speed square
- Tape measure, pencil, and safety gear (goggles, gloves, ear protection if using power saws)
Optional Upgrades
- Lattice panels (2×8 or 4×8 sheets) for privacy or vine support
- Shade cloth or painter’s drop cloth for temporary roof cover (canvas drop cloths work well, as shown in simple shade pergola tutorials)
- Decorative corbels or rafter tail templates for visual flair
Material costs vary by region and lumber grade. As of 2026, pressure-treated lumber averages $8–$12 per 8-foot 2×6 and $15–$25 per 10-foot 4×4. Cedar runs 50–100% higher but requires no chemical treatment.
Corner Pergola Designs to Maximize Limited Space
Corners are dead zones in many yards. A pergola turns that neglected 90-degree angle into a destination.
L-Shaped Corner Pergola
This design uses three posts instead of four, with two beams meeting at a right angle. The open side faces the yard, creating a semi-enclosed nook.
Best for: Small patios, deck corners, or garden seating areas.
Dimensions: 6×6 feet per leg of the “L” works well. Use 4×4 posts at each corner and one shared post where the beams intersect.
Construction tip: The corner post bears the most load. Use a Simpson Strong-Tie ZMAX post base or similar rated hardware, and set the footing at least 12 inches deeper than the other two posts.
Triangular Corner Pergola
A 45-degree angled pergola fits snugly into a corner, with the longest beam running diagonally.
Best for: Tight spaces where an L-shape would protrude too far.
Dimensions: A 5-foot triangle (measured along each wall) creates roughly 12.5 square feet of coverage.
Construction tip: Cutting compound miters on rafters requires a miter saw set to both bevel and miter angles. Test cuts on scrap lumber first. For beginners, woodworking plan libraries often include printable templates with pre-calculated angles.
Overhead vs. Angled Roof
Most corner pergolas use flat rafters running parallel to the beams. For more weather protection, builders can pitch the rafters at a slight angle (5–10 degrees) to encourage water runoff. This requires adjusting post heights, the back posts should be 6–12 inches shorter than the front posts.
Freestanding Mini Pergola Ideas for Patios and Decks
Freestanding pergolas offer placement flexibility and don’t require attaching to the house, a major advantage on vinyl-sided homes or where flashing details get complicated.
Classic Four-Post Design
The workhorse of small pergolas. Four 4×4 posts support two parallel beams, with 2×4 rafters laid perpendicular.
Dimensions: 6×8 feet or 8×8 feet suits most patio furniture arrangements. Allow at least 7 feet of interior clearance height for comfortable headroom.
Anchoring options:
- Concrete footings: Dig holes 10–12 inches in diameter, 24–36 inches deep (deeper in cold climates). Set posts in 2–3 inches of gravel, plumb with braces, then pour concrete. Let cure 48 hours before adding beams.
- Surface-mount post bases: Bolt galvanized post anchors directly to a concrete patio or deck framing. Check deck joist spacing and blocking, posts must land over solid support, not between joists.
Arched or Curved Top Pergola
Replacing straight rafters with curved laminated beams or bent metal tubing softens the look and adds a cottage-garden feel.
Materials: Flexible PVC trim boards (1×6 or 1×8) can be bent into gentle arches and screwed to the tops of posts. For tighter curves, laminate thin strips of cedar or plywood with exterior wood glue, clamping them to a curved form until dry.
Best for: Arbor-style entrances to garden paths or focal points in open lawns.
Cantilevered Pergola
Beams extend 18–24 inches beyond the posts on one or both ends, creating a floating effect.
Structural note: Cantilevers shift load dynamics. The extended beam acts as a lever, putting extra stress on the post connections. Use through-bolts (½-inch diameter minimum) rather than screws, and consider doubling up beams (two 2×6s sandwiching the post) for added strength.
Best for: Covering a grill station or potting bench where posts would interfere with workflow.
For builders tackling multiple weekend projects, small-scale upgrades like a freestanding pergola pair well with other compact renovation strategies that maximize outdoor living areas.
Attached Small Pergolas for Doorways and Entryways
An attached pergola anchors to the house on one side, reducing material and footing work. It also creates a seamless transition between indoor and outdoor spaces.
Ledger-Board Installation
The house-side beam (the ledger) must be bolted securely to the home’s framing, not just siding.
- Locate wall studs or rim joist using a stud finder. Mark fastener locations every 16–24 inches.
- Remove siding in the ledger area if necessary. Vinyl or fiber cement siding should be cut back to expose sheathing.
- Install flashing above the ledger to prevent water intrusion. Use galvanized Z-flashing tucked under the house wrap or siding.
- Bolt the ledger with ½-inch lag bolts or through-bolts (if accessible from the interior). Predrill holes to prevent splitting.
Code note: Many jurisdictions require ledger attachments to meet IRC deck ledger standards, even for pergolas. This typically means hot-dipped galvanized or stainless fasteners and specific bolt spacing.
Door and Window Pergolas
A 4×6-foot or 5×8-foot pergola over a back door adds charm and frames the entrance.
Clearance: Maintain at least 6 inches between the top of the door and the lowest rafter to avoid a tunnel effect. If the door is 6 feet 8 inches tall, rafters should sit at least 7 feet 2 inches above the threshold.
Post placement: Keep posts 36–48 inches from the door swing to allow furniture or foot traffic. Use surface-mount post bases on concrete stoops, or dig footings for posts set in adjacent soil.
Regional Styles
Attached pergolas vary by design tradition. Southern-style versions often feature turned posts and decorative brackets, creating a porch-like aesthetic common in warmer climates. Craftsman designs use chunky 6×6 posts and exposed beam tails with chamfered or curved ends.
Creative Finishing Touches: Vines, Lighting, and Decor
A bare pergola is a blank canvas. Strategic additions transform it from a structural element into a true outdoor room.
Climbing Plants
Fast growers (1–2 seasons to cover):
- Wisteria: Fragrant blooms, aggressive growth. Requires annual pruning and strong support, mature vines can weigh hundreds of pounds.
- Clematis: Lighter weight, wide color range. Prefers roots in shade, vines in sun.
- Hops: Vigorous annual in cold climates, perennial in mild zones. Dies back in winter.
Slower, low-maintenance options:
- Climbing roses: Need training and occasional tying to rafters.
- Trumpet vine: Attracts hummingbirds. Spreads via suckers, plant in contained beds.
Planting tip: Set vines 12–18 inches from post bases, angling them toward the structure. Mulch around the root zone to retain moisture, but keep mulch 3–4 inches away from the posts to prevent rot.
Lighting
String lights: The easiest option. Drape Edison-bulb café lights or globe string lights across rafters, securing with screw-in cup hooks every 2–3 feet. Use outdoor-rated, UL-listed products. Plug into a GFCI-protected outlet.
Low-voltage systems: 12-volt LED spotlights or deck lights can be mounted on posts or beams. Requires a transformer (typically rated 100–300 watts) and buried or surface-mount wiring. More permanent but also more labor-intensive.
Solar options: Solar post cap lights slip over 4×4 posts. Output is modest, best for accent lighting rather than task lighting.
Shade and Privacy
Retractable canopies: Canvas or polyester shade sails attach to eye bolts on rafters. Remove them in winter to prevent snow load damage.
Lattice panels: 2×8-foot privacy lattice (wood or vinyl) can be fastened vertically to posts for side screening. Paint or stain before installation, it’s easier than working overhead.
Outdoor curtains: Weatherproof fabric panels hang from curtain rods or galvanized wire strung between posts. Use stainless steel grommets and shower curtain rings for easy sliding.
Safety note: Any electrical work beyond plugging in a cord may require a permit and inspection. If running new circuits or installing permanent fixtures, consult local codes or hire a licensed electrician.
Conclusion
Small pergolas prove that impactful outdoor upgrades don’t require sprawling yards or hefty budgets. Whether it’s a corner design that reclaims wasted space, a freestanding unit that anchors a patio, or an entryway structure that frames a doorway, these compact builds deliver architectural interest and functional value. With basic carpentry skills, a weekend’s worth of effort, and attention to proper footing and fastening details, DIYers can create a lasting feature that transforms how they use their outdoor space.