Fire pits extend the backyard season well into fall and early spring, but the ground around them takes a beating. Grass scorches, mulch becomes a fire hazard, and bare dirt turns to mud after rain. Gravel solves all three problems while adding texture and definition to the space. It’s affordable, drains well, and doesn’t require the precision of pavers or the expense of a full patio. Whether adding a simple ring around an existing fire pit or designing a full lounge area, gravel offers flexibility that works with nearly any yard layout and skill level.
Table of Contents
ToggleKey Takeaways
- Gravel fire pit area designs solve common ground problems like scorched grass and mud while offering affordability, excellent drainage, and flexibility for any yard layout.
- Crushed stone (¾-inch or ⅜-inch) is the ideal gravel choice for fire pits because its angular edges interlock to resist displacement, unlike pea gravel which migrates easily.
- A properly built gravel fire pit area requires 4–6 inches of excavation, landscape fabric to block weeds, and a 3–4 inch depth of gravel for optimal stability and weed suppression.
- Permanent built-in fire pits typically require building permits and must meet local setback requirements (often 10–25 feet from structures), while portable units usually face fewer restrictions.
- Enhance your gravel fire pit with non-sinking furniture (Adirondack chairs, metal bistro sets, teak benches), strategic lighting, and surrounding plantings to create a cohesive outdoor retreat.
- Avoid calcium-based stone like limestone for frequently used wood-burning fire pits, as extreme heat above 1,000°F can cause the stone to break down into powder.
Why Choose Gravel for Your Fire Pit Area
Gravel handles heat, foot traffic, and weather better than organic ground covers. Unlike wood chips or pine straw, it won’t ignite from stray embers, critical in any fire pit setup. The angular, crushed varieties lock together underfoot, creating a stable surface that won’t shift as much as pea gravel.
Drainage is another advantage. A 3–4 inch gravel base allows rainwater to percolate through instead of pooling around seating or the fire pit itself. This keeps the area usable year-round and prevents the freeze-thaw damage that can crack solid surfaces in colder climates.
Maintenance stays minimal. Gravel doesn’t rot, fade, or attract termites. An occasional rake to redistribute stones and a light top-up every couple of years handles most upkeep. Weeds can push through if landscape fabric isn’t installed beneath, but spot-treating is straightforward.
From a code perspective, gravel itself doesn’t trigger permits, but the fire pit might. Many jurisdictions require permanent fire features (built-in stone or brick pits) to sit a certain distance from structures, often 10 to 25 feet. Portable fire pits usually have fewer restrictions, but always confirm local fire ordinances before breaking ground.
Selecting the Best Gravel Type for Fire Pit Spaces
Not all gravel performs equally around fire. Crushed stone (¾-inch or ⅜-inch) is the workhorse choice. Its angular edges interlock, resisting displacement when chairs get dragged or feet shuffle. Common varieties include crushed granite, limestone, and trap rock. Color options range from gray and tan to rust and charcoal, so it’s easy to match existing hardscape.
Pea gravel (⅜-inch smooth river rock) looks softer and feels gentler underfoot, but it migrates easily. It works better as an accent layer over crushed stone or in low-traffic zones. If choosing pea gravel for the main surface, edge restraint, steel, aluminum, or thick timber, is non-negotiable.
Decomposed granite (DG) compacts almost like asphalt when wet, creating a firm, dust-free surface. It’s popular in arid climates and modern outdoor living designs that favor clean lines. DG requires a stabilizer (natural or resin-based) to prevent erosion, and it’s not ideal in heavy-rain regions where it can wash out.
Avoid limestone or other calcium-based stone if the fire pit will see frequent high heat. Extreme temperatures can cause calcination, the stone breaks down into powder. For wood-burning pits that regularly hit 1,000°F+, granite or basalt-based aggregates hold up better.
Coverage: One ton of gravel typically covers about 100 square feet at 2 inches deep, or roughly 65 square feet at 3 inches. Most fire pit areas work best with a 3–4 inch depth for stability and weed suppression.
Design Layouts: From Minimalist to Luxurious
Layout depends on how the space will be used, quick evening fires for two, or weekend gatherings with a dozen guests. Scale the gravel footprint to accommodate seating, pathways, and a safety buffer around the fire source.
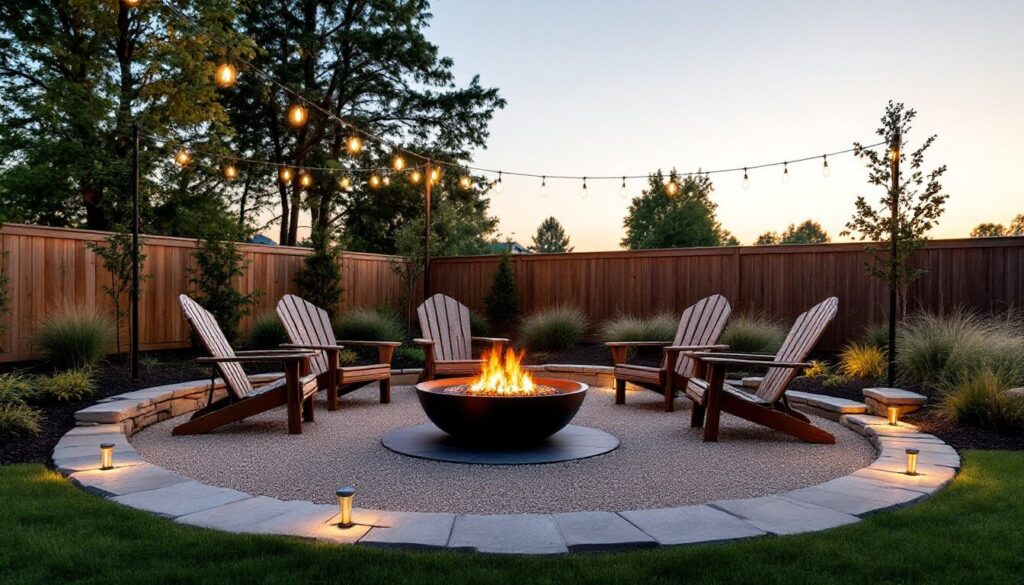
Circular Gravel Pits with Stone Border
A circular layout centers the fire pit and radiates seating outward. This design suits smaller yards and creates an intimate feel. Start with a diameter of 12–16 feet for four Adirondack chairs or a curved bench.
Edge the gravel circle with stacked stone (flagstone, fieldstone, or cut blocks) set in a single or double course. The stone border contains the gravel, defines the space visually, and provides a transitional zone between lawn and aggregate. For a tighter budget, use landscape timbers (6×6 or 8×8 pressure-treated) or steel edging (¼-inch thick, 4–6 inches tall).
Keep the fire pit itself on a non-combustible pad, a 4×4-foot section of pavers, firebrick, or poured concrete rated for high heat. This protects the gravel below and gives a level base if the pit is a portable bowl or chiminea.
Rectangular Lounge Areas with Mixed Materials
Rectangular zones work well when linking the fire pit to an existing deck or patio. A 16×20-foot gravel pad can hold a fire pit, two sectional sofas, and a side table, with room to move between seating.
Mix materials for visual interest and function. Run a flagstone walkway through the center, flanked by gravel on both sides. Or inset a paver patio section directly under the fire pit and main seating, letting gravel fill the perimeter and pathways. This approach reduces gravel volume (and cost) while adding a firmer surface where people spend the most time.
Another option: use railroad ties or thick timbers to create tiered levels if the yard slopes. Step down 6–8 inches from the lawn to the gravel area, retaining the grade with stacked ties. This adds dimension and helps with drainage on sloped lots.
For a more polished look, border the rectangle with cut bluestone or granite pavers and plant low groundcovers (creeping thyme, sedum) between stones. The contrast between angular pavers and loose gravel echoes country-style outdoor spaces without requiring a full hardscape install.
How to Build a Gravel Fire Pit Area: Step-by-Step Guide
This process applies to a basic gravel surround for a portable fire pit. Adjust dimensions and edging as needed for built-in or permanent installations.
Materials:
- Landscape fabric (commercial-grade woven polypropylene, not thin plastic sheeting)
- Crushed stone or pea gravel (calculate volume based on area × depth ÷ 12, in cubic feet)
- Edging material (steel, plastic, stone, or timber)
- Crushed stone base (optional but recommended: ¾-inch minus or #57 stone, 2-inch layer)
- Landscape spikes or stakes (for fabric and edging)
Tools:
- Flat shovel and spade
- Rake and tamper (hand tamper or plate compactor for larger areas)
- Wheelbarrow
- Tape measure and marking paint or stakes with string
- Level
- Work gloves and safety glasses
Steps:
-
Lay out the perimeter. Use marking paint or stakes with string to outline the fire pit area. A garden hose works for curved edges. Measure twice, it’s easier to adjust chalk than to move a ton of gravel.
-
Excavate 4–6 inches. Remove sod and topsoil within the marked area. For gravel-only installs, dig 4 inches. If adding a crushed stone base, go 6 inches. Keep the bottom as level as possible: a hand tamper or plate compactor helps.
-
Install edging. Set steel or plastic edging along the perimeter, securing with landscape spikes every 3 feet. For stone or timber borders, lay them in the trench and backfill the outside with soil to anchor them. Check level as you go, edging that’s off by an inch will show once gravel settles.
-
Lay landscape fabric. Roll fabric across the excavated area, overlapping seams by 6–12 inches. Pin with landscape staples every few feet. Fabric blocks weeds while allowing water to drain. Skip this step and expect to pull weeds monthly.
-
Add base layer (optional). Pour 2 inches of crushed stone (#57 or ¾-inch minus) and rake level. Compact with a tamper. This step improves drainage and stability, especially in clay-heavy or poorly draining soils. It’s not required for sandy or well-draining sites.
-
Spread finish gravel. Pour gravel in small loads, raking to an even 3–4 inch depth. Work from the center outward to avoid walking on finished areas. Compact lightly with a tamper: over-compacting crushes angular edges and reduces interlock.
-
Set the fire pit. Place the fire pit on a non-combustible base (pavers, concrete, firebrick) centered in the gravel area. Double-check clearances to seating, structures, and overhead branches. Most manufacturers recommend 10 feet minimum from combustibles.
-
Water and settle. Lightly mist the gravel to help it settle. Top up low spots after a day or two.
Permits and codes: Permanent, built-in fire pits often require a building permit and must meet setback requirements. Portable units usually don’t, but local fire codes may restrict open flames during burn bans or high wind. Call the local building department before digging if unsure.
Enhancing Your Gravel Fire Pit with Seating and Decor
Gravel sets the foundation, but seating, lighting, and plantings turn the area into a true retreat. Choose furniture that won’t sink, Adirondack chairs, metal bistro sets, or teak benches distribute weight better than lightweight resin. If using cushioned seating, add furniture pads or wide plastic feet underneath legs to prevent them from punching through gravel.
Built-in seating takes more effort but maximizes space. Construct a low stone or concrete block bench along one edge, topping it with pressure-treated 2×12 or composite decking for the seat. Cap with outdoor cushions stored inside when not in use. This setup works especially well in rectangular layouts where one side backs up to a fence or garden bed.
Lighting extends usability into evening hours. Solar path lights stake directly into gravel and highlight walkways. For ambient glow, string low-voltage LED cafe lights overhead between posts or trees. Battery-powered lanterns on side tables add portable light without trenching for electrical.
Plantings soften hard edges and integrate the fire pit into the landscape. Border the gravel with ornamental grasses (fountain grass, blue fescue), low shrubs (boxwood, dwarf spirea), or perennials like lavender and salvia. Avoid planting directly against the gravel edge: leave a 6-inch mulched gap to reduce gravel migration into beds.
For additional functionality, tuck in a small firewood storage rack or built-in log holder at the perimeter. Keep it far enough from the fire to meet safety codes but close enough to restock without crossing the yard. Galvanized metal bins or stacked stone enclosures blend with most design styles and protect wood from ground moisture.
Accessories like outdoor rugs can define seating zones, though they’ll need regular shaking to remove gravel. Choose flat-weave or synthetic materials that handle moisture and UV exposure. Fire-resistant mats placed directly under the fire pit add an extra layer of protection and simplify cleanup.
For more ideas on integrating fire features into backyard living areas, consider how gravel coordinates with existing hardscape, whether that’s a deck, patio, or pathway system. Matching or complementing gravel color to other stone elements creates a cohesive look without requiring identical materials throughout the yard.