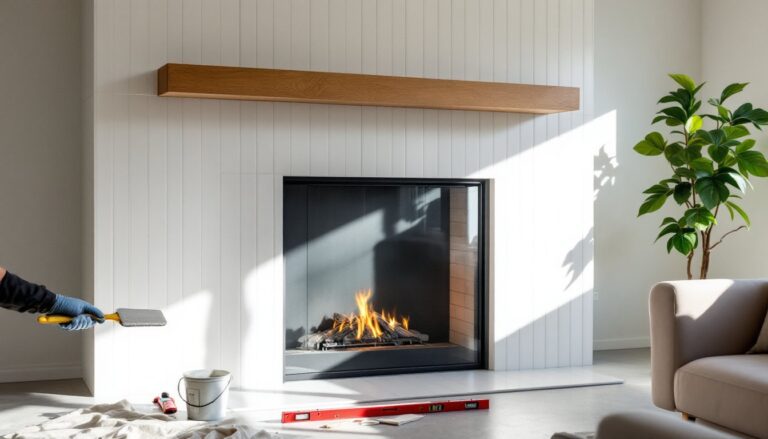

A fireplace wall that stretches twelve, sixteen, or even twenty feet toward the ceiling isn’t just a focal point, it’s a design challenge that can dominate a room if handled poorly or become the most striking feature in the home when done right. High ceilings amplify scale, expose awkward proportions, and create visual voids that standard decorating tricks can’t fix. But they also offer an opportunity to layer materials, play with verticality, and create genuine architectural drama. This guide breaks down practical, achievable approaches for homeowners tackling tall fireplace walls, from material selection and installation considerations to decorating strategies that balance height without requiring a ladder every time the room needs a refresh.
Table of Contents
ToggleKey Takeaways
- High ceiling fireplace wall ideas require vertical design solutions like full-height stone, shiplap, or built-in shelving to eliminate visual voids and awkward proportions.
- Natural stone veneer costs $15–$30 per square foot, while manufactured stone cuts weight by 75%, making it more DIY-friendly for tall installations.
- Running material floor-to-ceiling without interruption creates a cohesive look; stopping halfway emphasizes the proportions you’re trying to solve.
- Wood finishes require proper fire clearance (6 inches from masonry fireplaces, 12+ inches from factory-built units) and should be protected with water-based polyurethane or hard wax oil.
- Oversized artwork, mirrors, floor-to-ceiling built-ins, or vertical gallery walls anchor tall spaces better than standard mid-wall decor.
- Always prioritize safety with proper scaffolding, a second person for material handling, and structural assessment before retrofitting heavy materials on high ceilings.
Why High Ceiling Fireplace Walls Deserve Special Design Attention
Tall fireplace walls create proportion problems that don’t exist in standard eight-foot rooms. A mantel at the typical 54-inch height looks lost on a sixteen-foot wall. A single piece of artwork above it floats in dead space. The vertical expanse draws the eye upward, but if there’s nothing to guide that movement, the wall reads as unfinished.
From a structural standpoint, high-ceiling installations often involve different framing considerations. Load-bearing concerns increase with heavier materials like full-height stone veneer, which can add significant weight. If the home was built with a two-story great room, the wall may already have additional studs or blocking to support such treatments, but retrofitting requires careful assessment. Always check local building codes, some jurisdictions require structural review for veneers exceeding certain weights per square foot.
Scale also affects material costs and labor. A standard stone veneer install might run $15–$30 per square foot, but scaffolding, additional labor hours, and waste from cutting increase expenses on tall walls. DIYers need to be realistic: working above ten feet requires proper scaffolding or adjustable platforms, not a wobbly step ladder. Safety equipment, harnesses for scaffolding work, non-slip footwear, and a second person to stabilize materials, is non-negotiable.
Dramatic Stone and Brick Treatments for Soaring Fireplace Walls
Natural stone, brick, and manufactured stone veneer remain the most impactful materials for full-height fireplace walls. They add texture, mass, and a sense of permanence that drywall or paint can’t match. Real stone (limestone, granite, fieldstone) offers authenticity but demands professional installation on tall walls due to weight and mortar requirements. Manufactured stone veneer, molded concrete products designed to mimic natural stone, cuts weight by roughly 75%, making it more DIY-friendly and easier on existing framing.
For a cohesive look, run the material floor-to-ceiling without interruption. Stopping halfway creates a visual break that emphasizes the awkward proportions you’re trying to solve. If budget limits full coverage, consider a vertical column of stone centered on the firebox, extending to the ceiling, with painted drywall on either side. This maintains the vertical line without the cost of wrapping the entire wall.
Installation notes: Manufactured veneer typically installs over a moisture barrier and metal lath, attached to studs with corrosion-resistant screws. For walls above twelve feet, work in horizontal courses from bottom to top, allowing mortar to set every few feet to prevent slippage. Use a story pole, a straight board marked with course heights, to keep joints consistent as you move up the wall. Grouting tall joints requires a hawk and trowel with extended handles to avoid constant ladder repositioning.
Brick offers a different aesthetic, warmer, more traditional. Thin brick veneer (½-inch thick) installs similarly to stone veneer and works well for DIYers. German smear or limewash treatments over brick soften the look and suit modern farmhouse styles, while leaving some brick exposed maintains texture. Many fireplace designs showcase full-height brick to anchor rooms with vaulted ceilings.
Modern Minimalist Approaches: Sleek Panels and Clean Lines
Not every tall fireplace wall needs heavy texture. Smooth, continuous surfaces in concrete, plaster, or large-format panels create a sleek, gallery-like backdrop that suits contemporary interiors. Fiber cement panels, such as those from James Hardie or similar manufacturers, come in 4×8 or 4×10 sheets and install over studs with minimal seams. When painted in a bold color or left in a matte finish, they emphasize height without visual clutter.
Venetian plaster or microcement applied floor-to-ceiling offers subtle texture and depth. Both require skilled trowel work, especially on tall surfaces where scaffolding limits mobility. Expect to hire a professional for finishes above ten feet unless you have extensive plastering experience. The payoff is a monolithic surface with no grout lines, seams, or breaks, just pure vertical sweep.
For a striking modern detail, consider a blackened steel or powder-coated aluminum surround that runs from hearth to ceiling. Fabricated metal panels bolt to a hidden frame and create crisp, industrial lines. This approach works particularly well with linear gas fireplaces, where the horizontal firebox contrasts with the vertical surround. Metal conducts heat, so ensure adequate clearance per the fireplace manufacturer’s specs and local fire codes, typically 6–12 inches from the firebox opening, depending on material and BTU output.
Tool considerations: Cutting fiber cement panels requires a circular saw with a fiber cement blade and a dust mask rated for silica. Cutting outdoors reduces cleanup. For metal panels, a metal-cutting circular saw or shear works best: a grinder creates excessive sparks indoors.
Incorporating Woodwork and Shiplap for Warmth and Texture
Wood brings warmth and grain that softens the vertical expanse of a tall fireplace wall. Shiplap, board-and-batten, reclaimed barn wood, and tongue-and-groove paneling all scale well to high ceilings. The key is choosing the right board width and orientation, narrow boards (4–6 inches) run horizontally to break up height, while wide vertical planks (8–12 inches) emphasize it.
Shiplap installs directly over studs or drywall using a finish nailer and 15- or 16-gauge nails. Start at the bottom with a level reference line, and use nickel spacers between boards for consistent gaps. On tall walls, work with a helper to hold boards level while you nail. Pre-finishing boards before installation saves hours of overhead painting later, just touch up nail holes and seams after install.
For a more dramatic statement, reclaimed wood in varying widths and finishes creates a rustic, layered look. Source from salvage yards or online suppliers: expect $6–$15 per board foot depending on species and condition. Installation is the same as shiplap, but plan for more cutting and fitting due to irregular dimensions. Always check for embedded nails or metal fragments before cutting reclaimed lumber, they’ll destroy saw blades.
Fire safety: Wood must meet clearance requirements around the firebox. The International Residential Code (IRC) generally requires combustible materials (including wood) to be at least 6 inches from the firebox opening on masonry fireplaces, and 12+ inches on factory-built units, though specs vary by unit. Many homeowners explore cozy fireplace treatments that incorporate wood safely by framing it around a non-combustible surround (tile, stone, metal) directly adjacent to the firebox, then transitioning to wood above the mantel and to the sides.
Finishing: Use a water-based polyurethane or hard wax oil for durability without yellowing. On tall walls, apply finish with a spray rig or extended roller to avoid lap marks.
Decorating Above the Mantel: Art, Mirrors, and Statement Pieces
Hanging artwork or mirrors on a sixteen-foot wall requires rethinking typical decorating rules. A single 24×36-inch piece floats awkwardly in open space. Instead, scale up or layer. A large-scale canvas (60×80 inches or larger) or a floor-to-ceiling mirror anchors the wall and visually fills the void.
When hanging oversized pieces, locate studs with a stud finder and use heavy-duty anchors rated for the weight. French cleats, interlocking wood or metal strips, distribute weight and make leveling easier on tall walls. One cleat mounts to the wall (screwed into studs), the other to the back of the frame: they hook together and allow lateral adjustment.
Vertical gallery walls work well on tall fireplace walls. Arrange multiple pieces in a column or asymmetric cluster that extends upward, maintaining 2–4 inches of consistent spacing. Use paper templates taped to the wall to plan layout before hammering nails. This approach suits collections of mirrors, artwork, or floating shelves with decor.
Mirrors amplify light and create depth, making them ideal for tall, narrow walls. Leaning a large mirror against the wall on the mantel or hearth is a no-install option, but secure it with earthquake putty or L-brackets to prevent tipping, critical in homes with children or pets.
Alternative statement pieces: Antique windows, large metal wall sculptures, or mounted architectural salvage (corbels, shutters, iron gates) add three-dimensional interest. When sourcing heavy or irregular items, ensure mounts penetrate studs and use toggle bolts or screw anchors rated for twice the item’s weight as a safety margin.
Built-Ins and Shelving to Balance Vertical Fireplace Walls
Built-in cabinetry or open shelving flanking the fireplace visually grounds a tall wall and adds functional storage. Floor-to-ceiling built-ins break the vertical line into manageable sections, lower cabinets, middle shelves, upper display areas, guiding the eye step by step rather than in one overwhelming sweep.
DIY built-ins typically frame out with 2×2 or 2×4 lumber, screwed to studs for stability. Face with ¾-inch plywood or MDF for cabinet boxes and backs, then add trim and doors. On tall walls, construct in sections: base cabinets to countertop height (30–36 inches), middle shelving from countertop to roughly 7 feet, and upper cabinets or open shelves above. This modular approach makes assembly manageable and allows access for electrical or media wiring.
For contemporary looks, consider floating shelves in staggered or asymmetric arrangements. Heavy-duty floating shelf brackets (welded steel or heavy-gauge aluminum) mount directly to studs and support surprising weight, often 50+ pounds per linear foot. Pair dark walnut or matte black shelves with a white or neutral fireplace wall for contrast, or match wood tones for a cohesive look.
Styling tips: On tall shelving, vary object heights and group in odd numbers (threes or fives). Leave some shelves sparse to avoid visual clutter. Backlighting with LED strip lights tucked behind shelves adds ambiance and draws attention upward. Homeowners seeking comprehensive home decor ideas often find inspiration for balancing tall spaces with built-ins and layered styling.
Tools needed: For built-in construction, a miter saw for trim cuts, a table saw or circular saw for plywood, a drill/driver for assembly, and a level (48-inch or laser) for keeping everything plumb on tall walls. Paint or stain built-ins before final installation to reduce overhead finishing work.
Conclusion
High ceiling fireplace walls aren’t obstacles, they’re opportunities to create architectural impact that standard rooms can’t match. Whether going bold with full-height stone, embracing minimalist panels, warming the space with wood, or balancing verticality with built-ins, the key is committing to the scale. Measure twice, plan for proper support and safety equipment, and don’t shy away from the height. The result is a room anchored by a fireplace wall that earns its prominent place.